Things To Know About Hiking Mt. Kilimanjaro
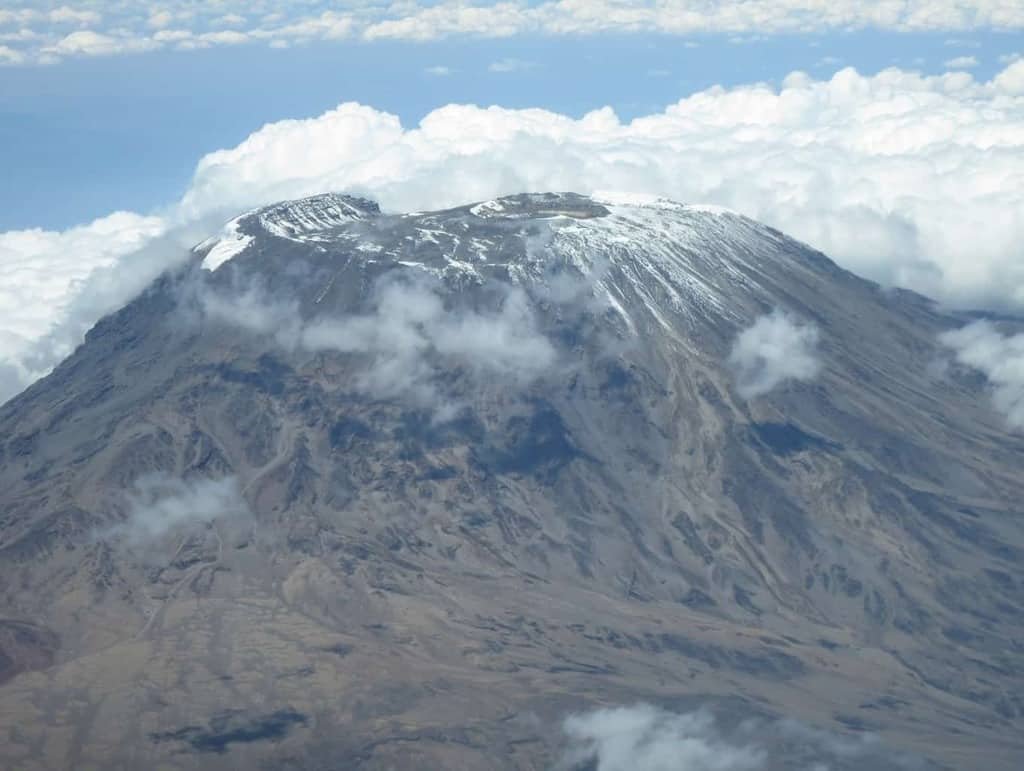
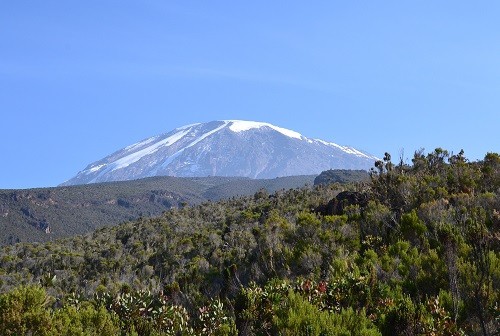
The reasons people set out to climb Mt. Kilimanjaro, the world’s highest freestanding mountain and the rooftop of Africa rising 19,341 ft., are vast. Whatever inspires you, this guide will help you plan and prepare to conquer this mountain.
When to Hike Kilimanjaro
The best time of year to hike Mt. Kilimanjaro is from late June through mid-October and January through February. Our trek started the last week of August. The rainy season spans March through June and November and December.
Select an Outfitter
There are many outfitters to choose from. Selecting a quality, reputable, and experienced company with medically trained guides is very important. We booked our trip with Peak Planet. A team of 17 assisted our small group of 3 during our trek: 1 guide; 1 assistant guide; 1 chef; 10 porters; and 4 helping porters. The services we received both before our hike, as well as on the mountain far exceeded many other operators we observed. Our summit was only possible because of the dedicated team committed to our success. Every member of our team was exceedingly friendly, hardworking, and truly made our trip special.
Select a Route
Peak Planet offers treks up the mountain along 6 routes ranging from 6-10 hiking days. The Machame Route (a 6 or 7 day hike), which is discussed in this guide, is the most popular. It is a scenic and challenging route. We selected the 7-day hike option along the Machame Route (9-day itinerary with Peak Planet) to give us an extra day to acclimate since the summit success rates increase by the length of the trek.
Cost
The prices for the 9-day Machame itinerary (7 days of hiking) with Peak Planet range from ~$2,570 to $3,260 per person for a private tour, depending on the number of people in your party. The group rate for the same itinerary is ~$2,750.
Travel to Tanzania
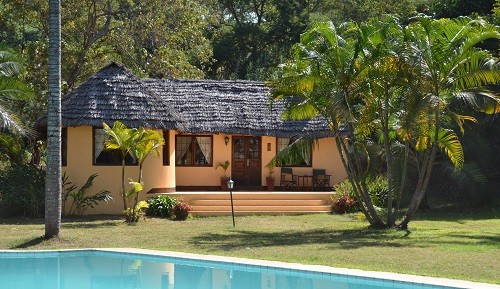
Fly into the Kilimanjaro International Airport (JRO) and transfer to your lodge in Arusha or Moshi. After you settle into your lodge, a representative from your outfitter will meet with you to give you an approximate one hour pre-climb briefing and equipment check, along with ensuring you have appropriate medical coverage and travel insurance. Lodges to consider in Arusha include: Arusha Serena Hotel and Arusha Safari Lodge.
Day 1
- Machame Gate: 5,942 ft. [1]
- Hike Time: ~5.5 hours (11:30 am – 5:00 pm)
- Distance: ~6.7 miles
- Elevation Gain: 3,969 ft.
- Machame Camp: 9,911 ft.
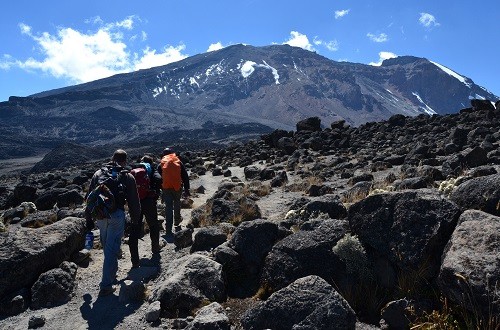
The drive from Arusha to the Machame Gate located at the southwestern side of the mountain takes approximately 90 minutes. We waited at the entrance for just over an hour, along with many other eager hikers, to complete the necessary registration formalities.
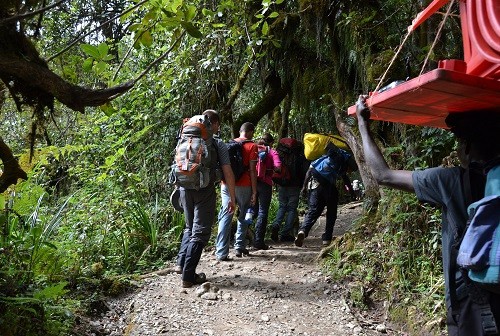
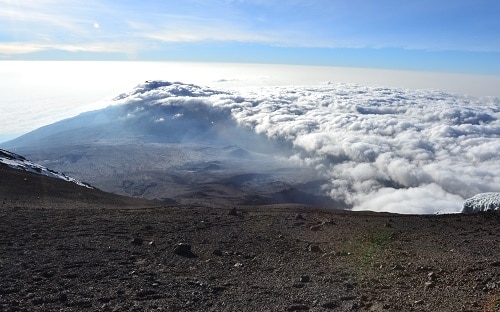
Your guide and assistant guide lead the way as you steadily follow a wide trail through a lush rainforest keeping a “pole pole” (Swahili for “slowly slowly”) pace. Your guides constantly remind you to “drinky-drinky” as staying hydrated helps prevent altitude sickness. The dense forest with green moss hanging down from the towering trees provides shade. While we quickly gained altitude, it felt gradual and not steep. The path narrows as you ascend into the clouds and to your first campsite.
Day 2
- Hike Time: ~5 hours (8:45 am – 1:45 pm)
- Distance: ~3.3 miles
- Elevation Gain: 2,684 ft.
- Shira Camp: 12,595 ft.
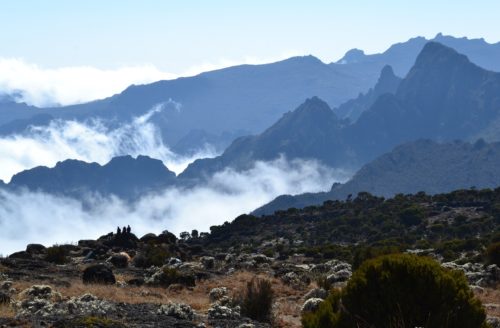
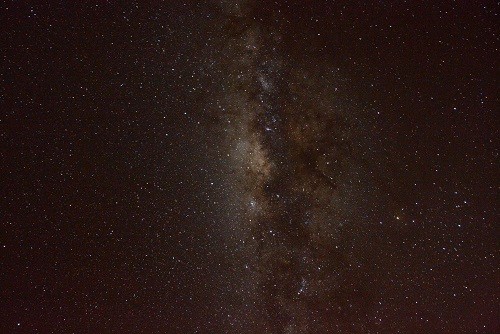
Within only a couple hours of hiking, you are above the tree line. The summit of Mt. Meru at 14,977 ft. floats among the clouds in the distance. The vegetation continues to thin. You climb up and over rocky hills throughout the day. Layers of dust invade everything. Despite my best efforts at keeping my nose and mouth covered with a scarf, I swallowed mounds of dust along the way. After arriving at camp, we went on a short acclimation hike beyond Shira Cave offering beautiful views of the summit. The view of the stars kept getting more incredible the closer we got to them.
Day 3
- Distance: ~6.7 miles from Shira to Lava Tower to Barranco
Shira to Lava Tower
- Hike Time: ~3.5 hours (8:15 am – 11:45 am)
- Elevation Gain: 2,585 ft.
- Lava Tower: 15,180 ft.
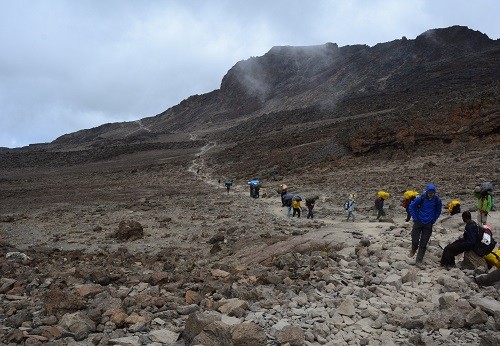
The vegetation thins even more as you ascend through dry and rocky terrain. Large dark rocks are scattered all over the barren and dusty path with occasional dry bushes sprouting up. As porters pass you (because even though they leave the campsite after you, they always pass you on the mountain), they turn right and continue onward directly to the campsite. Whenever we saw our beloved porters pass us, we smiled and cheered, “Jambo!” and “Asante Sana,” meaning “Hello” and “Thank you very much.”
You continue hiking up to Lava Tower. Lava Tower is just as the name suggests, it’s a tall tower made of volcanic rock. The hike is important to help you acclimate. You face the summit all the way up to Lava Tower. Behind you and all around you are views of the expansive alpine desert. If you have the opportunity to hike to the top of Lava Tower, the view is incredible, but the way up is frightening and maybe a little dangerous. Hiking to the top felt like a version of rock climbing without ropes.
Lava Tower to Barranco
- Hike Time: ~1 hour & 45 minutes (1:45 pm – 3:30 pm)
- Elevation Loss: 2,103 ft.
- Barranco Camp: 13,077 ft.
All the reward for making it so high felt like a major letdown as we descended ~2,000 ft., but hiking high and sleeping low helps with acclimation.
Day 4
- Distance: Barranco to Barafu: 5.3 miles
Barranco to Karanga
- Hike Time: 4 hours (8:30 am – 12:30 pm)
- Top of Barranco Wall: 13,842 ft.
- Karanga Camp: 13,235 ft.
The hike starts by climbing up the giant Barranco Wall that is made out of rugged rocks reaching nearly 850 ft. tall. The path up is a narrow and steep vertical climb, and often required crawling over and through rocks. It took us nearly 90 minutes to climb. From the top of Barranco Wall, you walk along the top of the wall into the clouds and then proceed back down. You meander up and down some more. Those on the 6 day Machame Route continue onward to the next campsite.
Day 5
Karanga to Barafu
- Hike Time: ~3 hours (8:00 am – 11:00 am)
- Elevation Gain: 2,060 ft.
- Barafu Camp: 15,295 ft.
It’s a short gradual hike along compacted scree as you gain altitude. The scenery along the wide path is barren. It became increasingly more difficult to find a suitable bathroom stop. As you cross over shattered rocks and stones, it sounds like you are walking over broken glass.
You make it to camp early to give you time to rest before starting the final stretch. The term “Barafu” means “ice” in Swahili, which seemed quite fitting based on the cold temperatures we experienced while there. We were in our tents by 6 pm to try to get a few hours of sleep before making the final ascent. I wiggled myself into the cocoon that was my sleeping bag, but was too anxious to sleep.
Day 6
- Distance: Barafu to Stella Point to Uhuru: 3 miles
Barafu to Stella Point
- Hike Time: ~5.5 hours (12 am – 5:30 am)
- Elevation Gain: 3,553 ft.
- Stella Point: 18,848 ft.
The final ascent typically starts around midnight so you can make it to the summit by sunrise. I had four layers on top (long chillys, long sleeve shirt, fleece sweater, and down jacket), three layers on bottom (long chillys, fleece pants, and snow pants), a neck warmer, a warm hat, and mittens. Every part of me remained toasty throughout the long summit night, except my nose and toes.
We started our ascent in the blackness of the night with headlights on our heads. You can only see what is immediately in front of you, the moon and stars above, and the little moving lights of the groups in front of you, constantly reminding you how high you still need to climb.
There are no barriers to protect you from the fierce winds. It was bitter cold, and only got colder the higher we climbed. The initial segment is extremely rigorous as you climb up a rocky wall. After passing the series of rocks, it felt like we walking up a dirt beach at a 35 to 40 degree angle. Not once did my heels or toes pass the other during this segment of the climb. At times, my feet slid backwards. As we got higher and higher, the air thinned. I started to get a minor headache and felt slightly fatigued. My backpack, although lighter than it had been on the prior days, felt like it weighed 50 tons.
Winetraveler Tip: Bring water bottles with you, turn them upside down, and place them in the interior pockets of your jacket. The water bottles need to be upside down because the top of the water bottle will freeze first. My water bladder in my CamelBak completely froze within two hours.
The steps got harder the longer and higher we climbed. The temperatures continued to feel colder. The gusts of winds felt stronger. Watching a hiker being rushed down the mountain at lightning speed because of altitude sickness was disheartening. The final 45 minutes to Stella Point was physically and mentally draining. We just kept pushing forward.
Stella Point to Uhuru Peak
- Hike Time: ~45 minutes (5:40 am – 6:25 am)
- Elevation Gain: 493 ft.
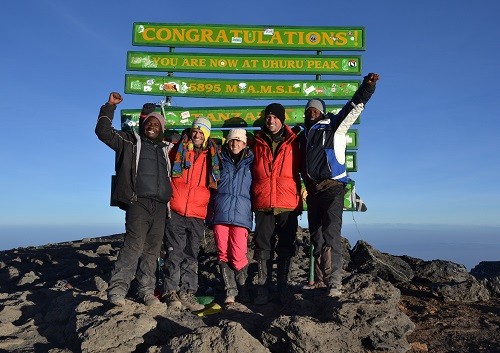
- Uhuru Peak: 19,341 ft.
It is a relatively easy stroll to the summit from Stella Point, but the altitude keeps it challenging. The rising sun provides warmth and breathtaking views of spectacular glaciers and ice cliffs. The green summit sign in the distance gave us increased motivation to continue pushing onward.
Uhuru Peak to Barafu
- Hike Time: 80 minutes (7:40 am – 9 am)
- Elevation Loss: 4,046 ft.
I felt rejuvenated with strength and energy with every step I took down back to camp. My appetite that had been nearly non-existent (a common effect at high altitude) the prior two days returned. The initial descent is basically like sand skiing, with skiing sticks (i.e., our hiking sticks) and all. It felt like we were flying. Our wonderful team of porters smiled and cheered for us when they saw us. It was a joyous and rewarding moment.
- Distance: Uhuru to Mweka Gate: ~12.8 miles
Barafu to Millenium Camp
- Hike Time: ~90 minutes (11 am – 12:30 pm)
- Elevation Loss: 2,739 ft.
- Millenium Camp: 12,556 ft.
You have time for an hour nap before continuing downward to your next camp. You rejoin the tree line, and warmth. Many hikers on the Machame Route continue down to Mweka Huts. Our team stopped us at the Millenium Campsite because it was more isolated.
Day 7
- Hike Time: ~3 hours (8:30 am – 11:30 am)
- Elevation Loss: 7,198 ft.
- Mweka Gate: 5,358 ft.
You have a considerable amount of elevation to lose in a short period of time, but it never felt dangerously steep. It was a welcome change being surrounded by trees, flowers and bushes, as opposed to barren land. We spotted several monkeys playing in the trees above us. You receive your certificate verifying that you made it to the summit, and are then transferred to your lodge where you can celebrate with a glass of wine.
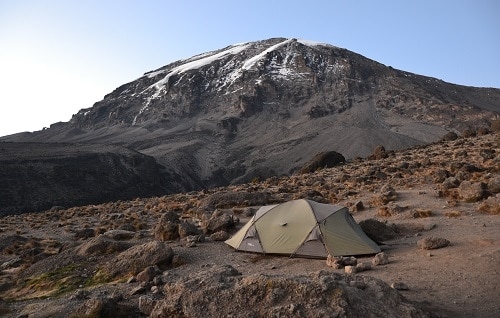
Camp Site
Our lovely team of porters always arrived to the campsite before us, assembled everything, and removed any trash around the campground.
- Sleeping Tents – Our sleeping tents had front and back entrances with a small foyer area on each side that was useful for putting on and taking off our dusty hiking shoes and for keeping the bucket of “wash-wash” we were given in the evenings.
- Toilet Tent – The toilet tent (included with the price of the hike with Peak Planet) was a bright blue rectangular tent, and was the most distinguishable feature of our campsite. It had a tailgate toilet in it. Having the toilet tent made waking up before the sun had risen and needing to use the restroom more bearable. I kept a flashlight, toilet paper, jacket and shoes so that they were easily accessible for middle of the night bathroom trips.
- Mess Hall Tent – The mess hall tent soon became our favorite place on the mountain thanks to our talented chef. The tent was just large enough to comfortably fit a small table and four surrounding chairs. The table always had thermos’ of hot water and hot tea, a jug of water, powdered milk, powdered chocolate mix, a bowl of sugar, and a jar of honey. The hot tea warmed us up as the temperatures continued to decrease as the night progressed. The meals on the mountains were always delicious, plentiful, and varied, and included items such as:
- Breakfast – Bread, tomatoes, cucumber, cantaloupe, bacon, eggs, sausage, and French toast. No breakfast was ever served without hot porridge.
- Lunch & Snacks – Sandwiches, pasta, egg burger, hard boiled eggs, chicken, bananas, zucchini soup, tomatoes, peppers, onions, peas, carrots, potatoes, cookies, popcorn, fries, and candy bars. Our assistant guide often carried around hot thermos of delicious soups and hot tea while we were hiking. We were like excited kids getting a new toy whenever he brought it out.
- Dinner – Tilapia, fried chicken, cucumber soup, onion soup, white rice, bread, mashed potatoes, spaghetti with meat sauce, green beans, cauliflower, spinach, cabbage, fried pineapple, banana stew, and a pancake dessert.
We were given our very own bright blue wash-wash bucket every morning and night, except from day 5 until we made it down to our last camp as there were no opportunities for the porters to gather water. Our porters carried at least 40 liters of water to ensure there was plenty of water to drink.
Gratuity
Tipping is customary, not mandatory. We were given the following tipping recommendations at the time of our trip for our group of 3 to collectively contribute: $90 for the guide; $60 for the assistant guide; $50 for the chef; $40 for each helping porter (i.e., $160 for 4 helping porters); and $25 for each porter (i.e., $250 for 10 porters) for a total of $610.
There was a tipping ceremony our last morning on the mountain. Our beloved team gathered around and sang us an upbeat song. We shared with them how much we appreciated everything they did for us, and distributed our tips. They smiled, cheered, sang us another song, and we all hugged as we said our final farewells.
Training
Summiting Mt. Kilimanjaro requires no technical mountaineering skills, but it is a challenging feat, especially due to the altitude. Training for the climb is important for a successful trip. There are estimates that nearly one-third of those that set out to climb Mt. Kilimanjaro never make it to the top. Since we had no nearby mountains, we trained by intensive stair climbing and beach workouts.
Packing List
You will need two bags: a backpack, and a larger backpack or duffle. The larger bag will be carried up the mountain from camp-to-camp by the superhuman porters who are often seen toting the bags on top of their heads. You will only have access to this bag at camp and not while hiking. Your big bag (which cannot exceed 15 kg. (33lbs)) will be weighed at the entrance gate before you start your climb. If you rent any equipment (which we did), all rented equipment is included in the maximum weight limit. We rented hiking sticks, down jackets, and sleeping bags, which contributed nearly 3kg to our total weight allotment per person.
- Clothing – I dressed in layers as the temperatures frequently fluctuated throughout the hike. It was very cold in the morning and overnight. Our bucket of “wash-wash” froze over by more than an inch overnight.
- Thick Socks
- Waterproof, Warm, Broken-in Hiking Boots
- Gaiters
- Full Body Hot Chillys
- Fleece Pants
- Short Sleeve Shirts/Tank Top
- Long Sleeve Shirts
- Fleece Sweater
- Waterproof Jacket
- Bandana/Scarf
- Sunglasses
- Warm Hat
- Waterproof Jacket
- Equipment
- Sleeping Bag for 0 degrees
- Collapsible Hiking Sticks
- Water Bladder
- Water Bottle
- Toilet paper – Keep it in a waterproof bag to prevent it from becoming wet from condensation in the toilet tent.
- Disposable towels that emerge in the water or other wash cloths
- Wet Wipes
- Soap/shower gel
- Hand Sanitizer
- Medicine – Malaria tablets, Diamox, Anti-diarrhea tablets
- Sunscreen
- Extras for Summit Day
- Head Lamp
- Neck Warmer/Ski Mask
- Down Jacket
- Snow Pants
- Gloves/Mittens – My Swany Toaster Mittens kept my hands so toasty on the final push to the summit that I actually had to take them off periodically to let my hands cool down.
Winetraveler Tip: Before traveling to Tanzania, visit the Embassy of Tanzania and Immigration websites for the most current visa, vaccination, and tourist information.
[1] The elevations and distances traveled are from the guide book we brought with us on the mountain: Stedman, Henry. Kilimanjaro The Trekking Guide to Africa’s Highest Mountain also includes Mount Meru & guides to Arusha, Moshi, Marangu, Nairobi & Dar es Salaam, 4th ed., 2014. The hike durations are how long it took us each day, and include our lunch, bathroom, and photo breaks. I included the times we hiked to give you an idea of what each day is like, especially on summit day.